Monday, 29 March 2010

Book Study-Corossive Effects

We are continuing to play with the techniques in Julia Andrus' Paper Transformed book. This time around Carol chose corrosive effects. You can see step-by-step photos on Carol's blog. Her choice of colours were different from mine so you can see the different effects you can achieve using other paint colours.

For this technique you mix an acrylic medium (such as gel medium), acrylic paint and sand or embossing powder together and paint it on wood, chipboard or layers of cardboard/cardtsock die cuts.

I took a mixuture of orange, red and brown acrylic paint, gel medium and some mixed embossing powders and painted it on a heavy cardboard frame and heart, a wooden flourish and some layered pieces of cardstock. I added some metallic paints over the smaller pieces and on the larger ones I used Perfect Pearls.

Just to see what would happen I used my heat gun on the flourish and the heart. It embossed a bit of the embossing powder that I used, but I rather like the effect as it made me think of some old pieces that were by the sea and corroded with salt.

I have embossing powder..

The swap using various mediums is continuing on CC Swaps. This month it is-"I have embossing powders and I know how to use them".

I decided to revisit and old technique that I had learned a few years ago. I took a piece of light grey cardstock and stamped with a Hero Arts stamp in white pigment ink and winter white embossing powder. After heat setting it, I went over it with purple fluid chalks using the Clearsnap stylus and foam tips.

I took another piece of cardstock two inches longer and folded it over at the 2 inch mark, embossed and coloured again with a different Hero Arts Stamp. I attached the two pieces together with double-sided tape.

I stamped and embossed an image by  About Art Accents and a fan image by Inkadinkado and attached them to the front. I then took a piece of the same cardstock and stamped the word stamp by  Above the Mark and coloured the piece with the fluid chalk ink and outlined it with a marker. I cut out a slot and added a piece of purple metallic cardstock behind, then adhered it with double-sided foam tape.

I stamped, embossed and coloured the inside of the front page. I then took some text weight paper and attached two pages to the inside and added another stamped embossed piece to the front of the pages on the inside. So far there are only two of us signed up for this swap and the other player loves Oriental images so I am sure she will be happy with this.

Colour Me!

I joined a swap on CCSwaps where we make an item using our favourite colours. Mine are green and blue  the colours I tend to use the most in my art.

I started with a piece of 100 lb Lunamat cardstock and stamped various images by Tim Holtz and Hearts in touch using Marvy, Distress and Versafine inks. I then stippled over the top with stipple brushes and dye inks.  I then stamped the word stamp by Stampers Anonymious with Ancient Page Coal.

I took two pieces of 130lb card stock and did the "stamp smoosh" technique (mentioned in other posts) with fluid chalk inks. I outlined all the pieces with a marker.

The inside is done with a text-weight lunamat paper and stamped with Tim Holtz stamps in blue and stippled with greenye inks. This insert is two pieces of the paper joined together and scored to make four (4) pockets. The edges are joined with pieces of the lunamat paper stamped coloured and scored to fit the ends and the middle.

I attached a coordinating ribbon to the inside and then attached the panels to the insert.

I took 4 tags and coloured them with dye and distress inks and stamped images on them and placed them in the pockets. I did not add fibres as I thought I would let the recipient choose the  ribbons or fibres for them.

I only scanned one side of the open booklet  as I did not feel like getting out my camera. When fully open the middle is a mountain fold and you can see all four tags in the pockets.

Dream Destination - Africa

For this month on CCSwaps the dream destination is Africa.

I used some leaf stamps for my background as they were the only thing I had to simulate the type of background I had in mind. I used Clearsnap fluid chalks in bisque, tangerine and Burnt Seinna on two pages and on the others I added dark moss.

I stamped the image from Coronado Island on a kraft coloured piece of card stock and cut it out. I added the frame then attached the image in the centre. The words are from a large Sandi Miller Art stamp that I cut out after I stamped them. I took some chip board letters from the dollar store and coloured them and stamped over them and attached them with Sookwang tape.

The inside images are from a UK site and the words are from the same Sandi Miller background stamp.

To attach the two pages together I cut two pieces of cardstock that I had coloured and stamped, scored them and attached them with double-sided foam tapes. It then added a couple of little faux rivets that I made from clay and coloured with Mica Magic ink.

The back piece is a picture framed with a slide mount which I covered with some scapbook paper, then stamped a PSX Pixie Expressions stamp around it.

Sunday, 14 March 2010

My Favourite Stamp

Another swap I chose to join in CCSwaps was making something with a favourite stamp.

Well, that was a hard choice as I have quite a few favourites. I chose to use one image and one word stamp that are both favourites.

I placed a piece of  handmade mono-printed background paper in my stamp positioner and stamped the image using Clearsnap Ancient Page Coal, which is a permanent dye ink. I then coloured the image using Tsukineko  Brilliance Gamma Green, Ranger Archival Tangerine and  Clearsnap Ancient Page Primrose inks using Ranger Cut n' dry Nibs.

With the piece still in the stamp positioner I stamped it again with the Ancient Page Coal. It still needed more depth, so I stamped it again with Clearsnap Mica Magic Burnt Orange.

I then edged this with a crayola metallic marker. I stamped the "Believe" word and embossed it with copper, and cut around it. Both were attached to the front and I added a couple of extra strips of the mono-printed paper.

I took some printer paper and made a background using Cathie Allan's stamp smoosh technique with 3 fluid chalk colours. I attached this to two pieces of cardboard and punched the holes and bound it with the Zutter Bind-it-all .

I attached some ribbon around the back and inserted a Phone Message pad inside which I got on sale at Michaels.

Beading experiments

In a recent neckalce swap on CC Swaps I received a lovely beaded necklace which inspired me to try making one.

I have a friend who will be celebrating a milestone birthday soon, so thought I would perhaps give her a necklace for a gift.

Here are the two I made, one of which I also made matching earrings to make a set.

Pin Swap

On CCSwaps we are having a brooch/pin swap. Now I do not profess to be a great jewellery maker but I will give most things a try, so I signed up for this swap.

 I started with a blank jewellery piece that I had in my stash. I cut out an Image from Moonlight Journey and covered it with Judikins Microglaze. I then cut out a piece of acrylic in a circle to fit over the image and adhered it with Glossy Accents. I glued this to the centre of the blank. I added some tiny glass beads around the piece then attached a bead to the bottom.

Book Study continued

Carol is continuing in leading us in trying the techniques from Paper Transformed by Julia Andrus. This latest is Luminous dusting and Luminous Lifting. See Carol's blog for step-by-step instructions with pictures.

For the Luminious Dusting I followed the instructions by stamping an image with Perfect Medium on black cardstock then dusted it with perfect pearls, then sprayed lightly with water to set them. The top two are very open (colorbook) images and the second is a stamp that I never used which somone gave me, but I quite like it with this technique (done on navy cardstock).
Personally, I think this technique works much better with a bolder stamp, as you can see by the last two that I did.

The Luminous lifting is done by covering the cardstock with Perfect Medium, Versamark or clear pigment ink. You then dust the entire piece with Perfect Pearls, and then stamp directly on to with your stamp which has been inked with clear embossing ink, Versamark or Clear Perfect Medium. This lifts the Perfect Pearls and leaves the image you stamped.

Nesting Tags

We are swapping a set of nesting tags on CC Swaps.

I took a couple of ready made tags and coloured the smallest with the Stamp Smoosh technique which I learned from Cathie Allan . This technique was featured in the September 2005 Scrap & Stamp Arts magazine where Cathie is a regular contributor. The Second tag was done using a technique I found on the Ranger website by Wendy Vecchi  where you put your inks directly on the cardstock, then rub one of the inkpads on a craft sheet, mist it with a mixture of perfect pearls and water,  stamp into the mixture then onto the cardstock. When the tag dried I stamped an image on top.

The third was a tag I cut out from some background paper that I made that was coloured with Clearsnap Fluid Chalks inkpads, overstamped with Alabaster Fluid Chalk, then sprayed with Glimmer Mist.

I placed the tag in my stamp positioner and stamped a Magenta Poppy with with several layers of pigment ink. I outlined each of the tags with a marker.

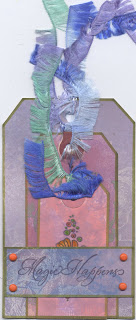
 I completed the largest tag by cutting a piece of the handmade background paper and stamping a saying (Serindipity Stamps) outlined it and attached it with brads to coordinate with the colours of the poppy. Finally added some fibres. The picture on the right is the three tags "nested" together.

March Charm

We are continuing the Charm swap on CCSwaps.

For the March one I took a small chipboard square and made a hole with a Japanese Screw Punh. I covered the chipboard with platinum pigment ink, then embossed it with platinum UTEE ( Ultra thick embossing). While it was hot I stamped into it with gold ink.

I then took a small chipboard butterfly from Scrapware and covered it with clear embossing ink and embossed it with Christmas Night glitter embossing powder. I still wanted more of a dimensional effect, so I coated it with Glossy Accents (Ranger).  I attached this with some glue to the centre of the charm and added the ring.