Showing posts with label smooch ink. Show all posts

Monday, 3 February 2014

Colour Perceptions - White

In ArtVentures the next colour perception is white. To me this colour is cool and pristine.

I started with white cardstock and using a stencil and Viva Decor Mother of Pearl modelling cream I embossed part of the base. I added some white lace to the right-hand side. I cut out a die from a cuttlebug embossing folder from 120LB cardstock and adhered it to the centre of the ATC.

I punched a circle from some lighter weight cardstock and coloured it with Moonlight Smooch ink by Clearsnap. I embossed the back and attached it to the centre of the die with some Scrap Dots (3-D glue) to allow it to keep it's shape, then placed it on the centre of the die.

To add a bit more interest, I covered a piece of white scrap cardstock with Sookwang tape and covered it with Glitter Ritz white glitter, then punched out some little flower shapes with a hand punch. These were adhered to the ATC in a few areas using glue dots. To complete the card I added a little paper holder brad to the bottom.


Tuesday, 26 March 2013

Altered Alphabet

Another swap on AFTCM is to alter an alphabet letter representing the first letter of our partners name.

My partner's given name starts with the letter L and she likes vintage, Victorian, lace and filigree .

I took several pieces of chipboard, cut them out in an L shape and glued them together. I covered the piece with some script scrapbook paper.  I had some large pieces of lace and glued it to the bottom of the L shape then sprayed the whole thing with some Dylusions Melted Chocolate spray and some glimmer mist.

I felt like it need something on the left hand side so I attached some wood scroll pieces to the edge after painting them with a deep red and brown acrylic paint. I also sprayed some roses and daisy flowers with the Dylusions spray, and attached them at the bottom left corner along with a leaf and a broken piece from a broach (which is the closest thing I had to filigree!).

I wanted some texture so I added some Stampendous Ancient Wine embossing enamel at the top, edges and on a few areas of the scrolls.

I coloured two little ceramic pieces with Smooch gold and attached them above the flowers along with a home made hat pin and an old safety pin. I layered two Memory Box bird house dies together and put it at the top with foam tape underneath to raise it a bit. I added an old earring at the top which looks like grapes; added a little bird cut from some scrapbook paper. I had a stamped butterfly on my desk so I glued it in with the flowers, then added a little bottle cap with the letter L imprinted on it.

On  the bottom I added the wood embellishment with the word Dream on which I had embossed the edges with the Stampendous enamel; added a little screw brad to it. I coloured two little dragonflies with permanent ink pens and Smooch Ink, removed the backs and glued them beside the wooden embellishment. The last step was to add tiny gems scattered throughout.

Monday, 17 September 2012

A-Z techniques- S

The next letter for the A-Z techniques on ArtVentures is S. I decided to do the Stamp Smoosh and Sparkle Marble which I learned from the wonderful Cathie Allan.

I used Lipstick Red, Lime Pastel, and Yellow Citrus fluid chalk inks to stamp smoosh the background and for the Sparkle Marble technique I used Siren, Luscious Lime and Gold Lame Smooch ink.

I decided to add a Cuttlebug die-cut star for the central image. I added some Sookwang tape to cardstock and ran it through my die-cutting machine. I removed the backing from the largest die-cut and covered it with some gold Stampa Rosa glitter. On the smallest star, removed the backing and covered it with Clearsnap's Cherry Pie Designer foil.

I decided not to add anything further as the background is so sparkly, although the picture does not show it very well.

Thursday, 16 February 2012

Row Houses

On Mixed Media Misfits Trish suggested a Row House swap. I have not made any of these for a while so I was up for this swap.

I coloured some cardstock with Clearsnap fluid chalk inks using Cathie Allan's Stamp Smoosh and Sparkle Marble technique. I attached this to a piece of cardboard and cut out the three house shapes.

I added some Tim Holtz tissue tape to the bottom and coloured it with the fluid chalk inks to make it blend in. I stamped an alphabet background stamp in a second generation in Versafine sepia ink.  I added a couple of other stamps to give it some depth. I took a piece of sequin waste and added this with some acrylic paints.

On the left hand one I added a corner piece from cuttlebug embossed with pearlised embossing powder at the top. The circles are stickers coloured with alcohol inks. The butterfly, roses and the lady are from Moonlight Journey.com.

On the middle one, at the top, I added a piece of a die-cut from Memory Box coloured
with Clearsnap Smooch Gold ink. I stamped the PSX saying with pearlised embossing powder. The image from digitalcollagesheets.com  and coloured with chalks and set it with Judikins Microglaze. The butterfly and the roses are from Moonlight Journey.

On the left hand one I added some opals embossing powder and stamped into it while hot with the alphabet background stamp. Added a corner sticker to the top coloured with alcohol inks. Added the lady, butterflies and roses from Moonlight Journey.

Paper Beads

On AFTCM we are doing an extra quick swap making paper beads.

I started by cutting some strips of a magazine page and rolled them on a skewer, then covered them with versamark and clear embossing powder and embossed them, twice. I added two different colours of Opals embossing powder and embossed them. To finish them I added some fantasy film over the top and heat set it to attach it.

I had a couple of extra pieces so I did the clear embossing on both. On one I added hidden colour blue embossing powder and when it cooled added some of the new Clearsnap Smooch glitter ink.

On the second one I added some of the Clearsnap  blue Sparkle Fibers then added clear embossing powder and some seed beads then another coat of the clear embossing powder. These are the two at the  bottom.

Wednesday, 1 February 2012

Heart Strings card

The card of the month swap theme on AFTCM was Heart Strings and as always the interpretation was up to us.

I started by cutting out 3 different heart shapes with a Sizzix die. The largest was covered with a piece of an old book page and I coloured it and the second one with Smooch Siren ink. The smallest has some book print on it and was coloured with both Smooch Siren and Gold ink. I took some gold and red metallic thread and wound it around the largest and smallest hearts - "heart strings".

For the background I used Cathie Allan's Stamp Smoosh technique with fluid chalk inks then her Sparkle Marble technique over the top.

I made some flowers using a the Tim Holtz die and the same colors of ink used on the background. I punched out some hearts and leaves and added them to the cards, along with some of the metallic thread. I added a little piece of a border die from Memorybox, which is actually a winter border but I added  some centres to the star shapes to make it look like a vine with flowers.

To finish the card I attached it to a black cardstock base.


Thursday, 15 September 2011

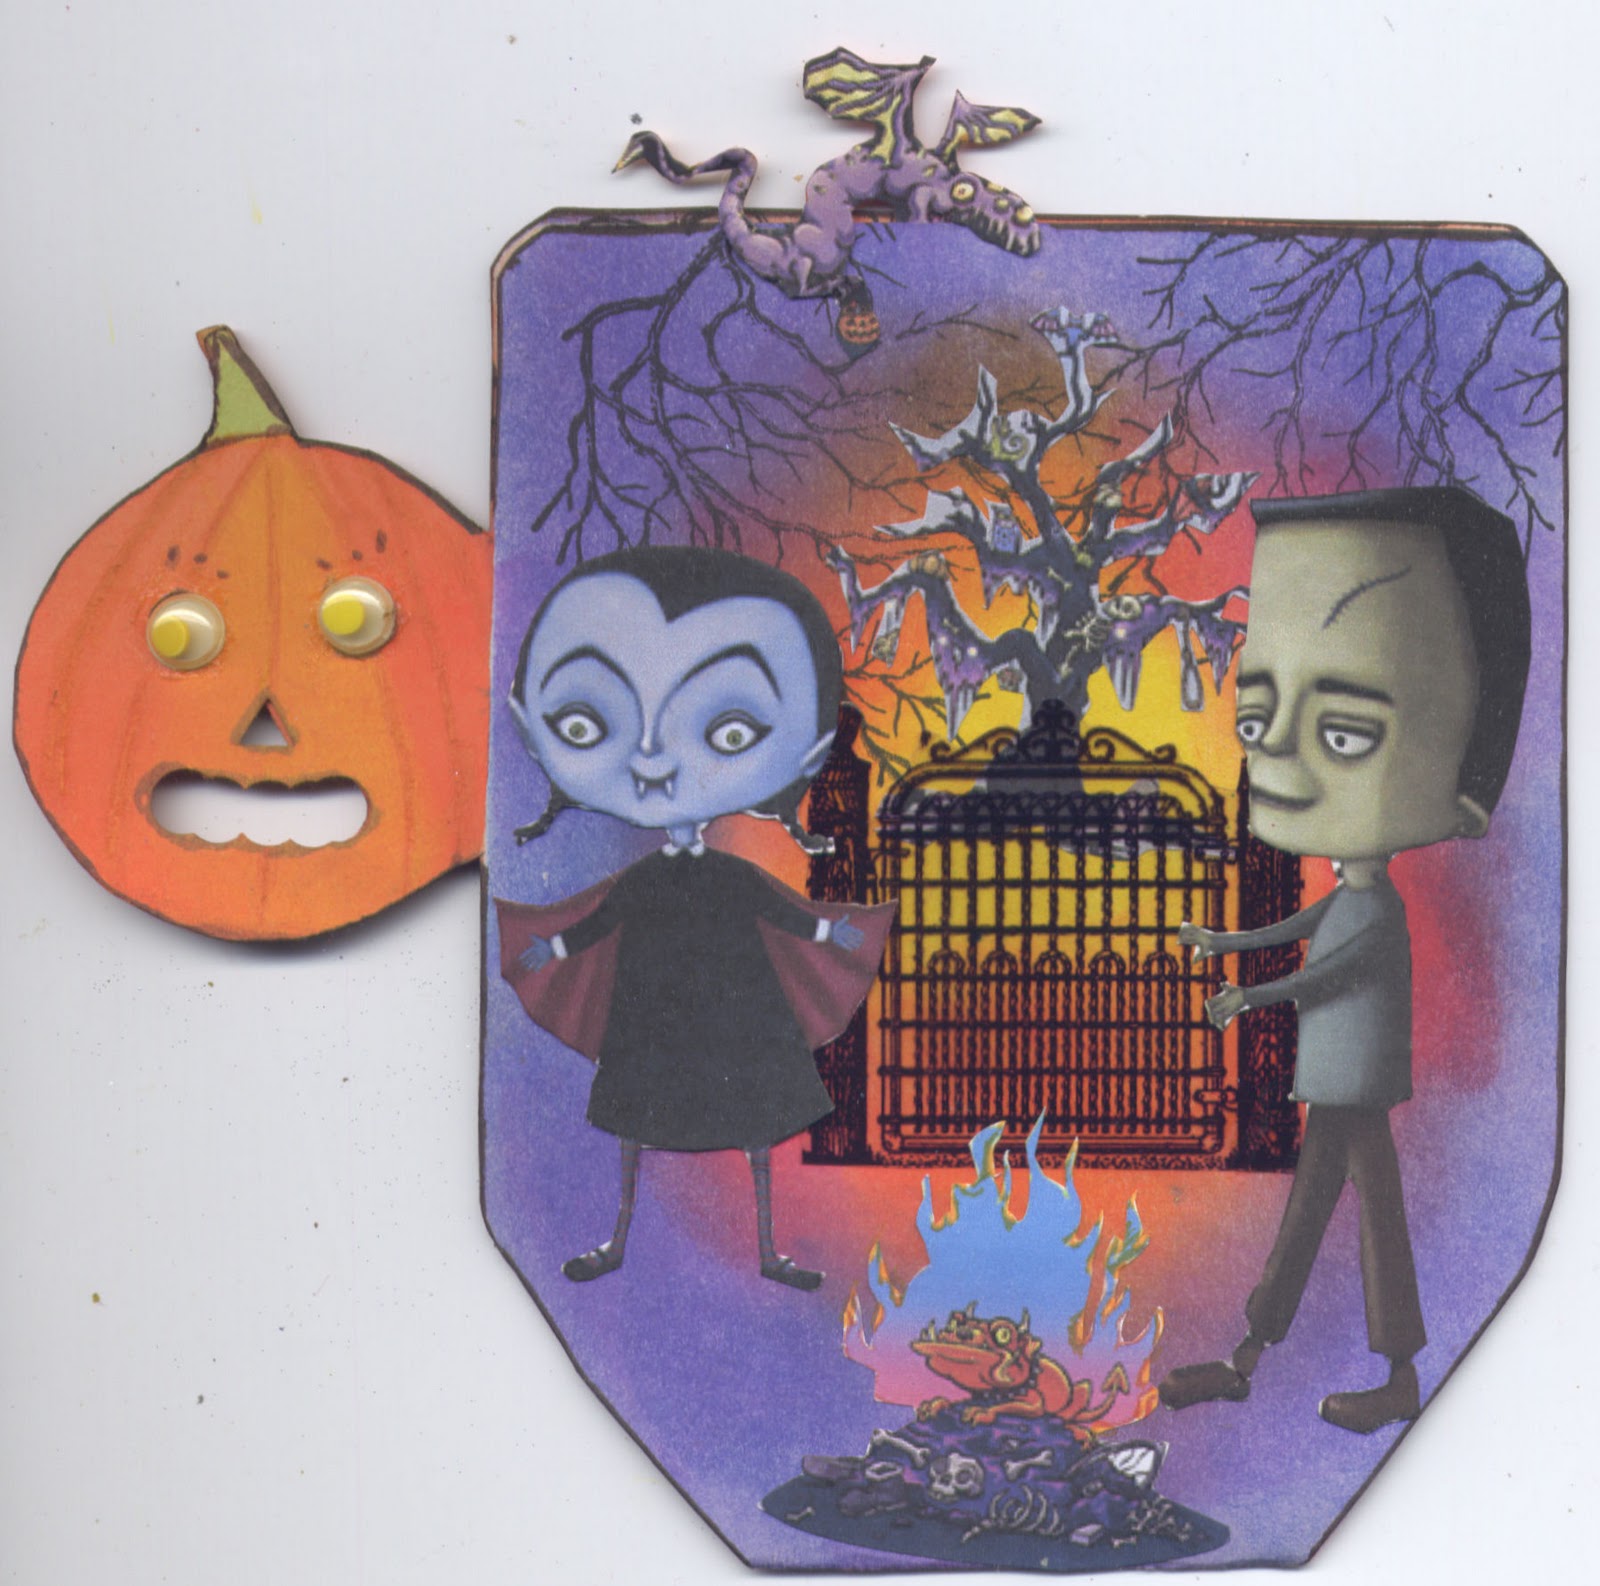
Halloween in a Teacup

On AFTCM there are a few Halloween swaps on the go, one being Halloween in a Teacup.

I was going to do a 3-D version, but due to postal costs decided to make it a double sided type of card with a pop-up in the middle.

I was low on ink in my printer, so I created my own template for a Mug and made handle a pumpkin shape.  I coloured the front with dye inks using the direct-to-paper technique using a Clearsnap stylus and foam tips. Stamped the Stampscapes stamp around the top then added images from Dover Art and Vintage Paintworks. Cut out the nose, eyes and mouth on the "pumpkins" with some punches.

The back is coloured with pigment ink and stamped with Stampscapes & Stampendous stamps, added a touch of Smooch ink to the rays in behind the pumpkin witch. Images are from Dover Art. 

I remembered that I had a bunch of "googly eyes" and decided to add them to the pumpkin handles.

The inside is stamped with Magenta and Stampscapes stamps, then images added from Dover Art and Lisa Vollrath's sayings.


Monday, 22 August 2011

A-Z techiques

Continuing on with the A-Z techniques in ArtVentures the latest letter is F. Mine is F for Foiled background, Fresco inks and Faux Pressed Flowers.

For this one I did a foiling technique on the background. I covered an ATC blank with some text paper from an old book, then sprayed it with walnut ink spray. After it dried I swiped a glue stick over it and when it was tacky I applied different colours of transfer foil over it.

For the main image, I had some ovals that I had punched out of left over cardstock and I applied various colours of Fresco inks to them, to co-ordinate with the flower colours. I then stamped a floral stamp on each one.

I took some paper flowers and attached them with a glue stick, then embossed the piece with the brocade Cuttlebug embossing folder, then added it to the ATC. To complete it I added some glitter to the centre of each flower. Some of the flowers were not in the colour palette that I liked so I coloured them with some Smooch ink.

Sunday, 3 April 2011

Ezee Pzee Design for March

This month's Ezee Pzee project was planter. I started by sealing the pieces and painted the inside of the box. I then attached some Mariposa Scrapbook paper to the outside of the pieces and glued it together.

I coloured some of the flowers with acrylic paint then embossed them and added washers and stickles. The large daisy type flower was coloured with smooch ink and H2O's. The centers of the flowers are some little embellishments I found at my local stamp store and others are washers that I coloured with alcohol inks, and some are some coloured reinforcements for 3 ring binder pages.

I stamped the Pedlars Pack butterfly on cardstock that I coloured with various shades  of green, two in black & two in gold. I added some of the strings of beading to the centres. All of them were attached to the box with double sided tape after bending the wings a bit.

The large flower from Ezee Pzee is done with pigment ink, fantasy film, clear Utee and Opal embossing powders then stamped into with a turquoise pigment ink while hot. I glued one of the embellishments to the centre and added a leaf that fell off one of the other flowers.


For the opposite side I found a saying that I liked and printed it off. I then took a chipboard label holder and covered it with green acrylic paint, embossed it with two colours of distress embossing powder then with Perfect Pearls. I placed the saying behind it and put two screw brads through the ends; attached it with double- sided foam tape.


Inside the planter I scrunched up a plastic bag and then cut a piece of corrugated cardboard to size and put it on top. I decided to place the flowers in little flower pots that I had on hand and to make them stay in place I glued some sea glass to the bottom of the stems, put some foil wrap around them and place them in the pots. i added some Indian Moss over the top to cover the foil.

The pots stood up quite well and I added a little butterfly, some ladybugs and a wee frog.


Monday, 21 February 2011

February Ezee Pzee Design Team Projects

The February kit came filled with all kinds of goodies, the main one being a bird house that we had to decorate and "build".

I started by painting all the pieces of the bird house in nice bright colours. For the front I took an old plastic doily and applied embossing paste, then when it dried I highlighted it with yellow paint.

For the flower on top I coloured it with Smooch ink and added a little pearl as the centre. The little birds were stamped and attached with foam tape.


For the next project I took an acrylic tag and embossed it in my Cuttlebug and inked it with green Stazon, then highlighte some of the areas with copper Goldfinger wax. I covered the Ezee Pzee flowers with some book text and coloured it them with Distress Ink. I painted some  washers and painted them with  copper paint and glued them to the centre.   The  Ezee Pzee bird was painted with copper, crackle finish and red acrylic paint.
The next project is a little chipboard square that I had in my stash that was painted and covered with various embossing powders.  I coloured the Ezee Pzee flower with orange paint and Perfect Pearls, and added a pearl to the centre. The Ezee Pzee  butterfly was coloured with orange and green Perfect Pearls. The letters were originally pewter so I coloured them with a gold Krylon leafing pen.
The second Ezee Pzee butterfly was covered with Be Creative tape, then I cut around it
and removed the backing. I punched out some flowers from the backing tape and placed them on the butterfly. I covered the whole piece with Glitter Ritz, then removed the flower pieces and added a second colour of Glitter Ritz. To complete it I added some gems and a piece of copper wire for the "feelers"


For the last Ezee Pzee butterfly and flower, I decided to make an Artist Trading Card. I took a piece of a worksheet that I had used to spray Smooch Spritz on previous projects and attached it to an ATC blank. I stamped a Magenta image first in black ink then with Brilliance Silver, and edged it with a silver Krylon leafing pen. The flower was coloured with Smooch Ink and some Perfect Pearls. The butterfly is coloured with Pearlex. I aded some micro beads for the body and a piece of black tie down for the "feelers". I coloured a little saying embellishment with the Smooch Ink.

The Kit also included an acrylic piece with a bird on it. I chose to incorporate this into a card. I coloured the background with pigment inks and stamped the Impression Obsession  cover the page stamp in Versafine ink and edged it with a marker. I added circle coloured in orange and attached it to simulate the sun. The acrylic piece was coloured with alcohol inks and attached over the "sun".  I then stamped the Hero Arts saying on another piece of cardstock and edged it with the marker. I placed a scrap piece of the background on the card and attached the saying; adhered the panel to the card.


The final piece is the last Ezee Pzee bird I decided to do a tag for an upcoming swap in my AFTCM group. I started by inking the background with a Magenta stamp using Cathie Allan's stamp smoosh technique using 3 different colours of fluid chalk inks.
I stamped the Diamond stamp (Hero Arts) in a darker blue at the top and bottom of the tag.
I had some wooden birdcages by Kaisercraft and took one of them and painted and embossed it using a technique by Shelly Hickox from her blog which has a tutorial on it.

I coloured the Ezee Pzee bird with the lighter and darker blue fluid chalk inks and stamped a text stamp over it with Versafine onyx black, then embossed it with clear embossing powder. I added some Judikins Diamond Glaze to the branch.

The little Ezee Pzee circle was coloured with a dark blue pigment ink. I coloured a piece of cardstock, stamped the Crafty Secrets word sing then placed it on the circle and embossed it in clear ink and embossing powder.

Prior to attaching all the elements, I edged the tag with a blue marker.

Thursday, 18 November 2010

Canvas ATC"S

In my Art-Ventures group, Carol S proposed a swap for ATC's on canvas. Luckily I had a couple of canvas ATC bases and joined the swap. As it turns out only 3 of us joined in so I had sufficient to complete the swap.

I decided to do the same technique but in different colours.

I painted the bases with gesso and let it dry. I coloured the first one with green paint, let it dry then added blue over the top. I let it dry a bit then spritzed it with rubbing alcohol and then dabbed over it with a cloth, allowing some of the green to show through. For the second one, I painted the base with orange, let it dry then added a burgandy red over it and followed the same procedure as the first, allowing some of the orange to show.

After they dried completely, I embossed them with a dreamweavers stencil and embossing paste and set them aside. When they were dry I used leafing on both. On the the orange/red one I applied a variagated orange colour, then I added some green apple smooch ink to the vines and to cover some of the areas missed by the leafing I coloured with Pumpkin Smooch ink.

On the blue one I  coloured the vines with the Green Apple Smooch, but the silver on the flowers was a bit glaring so I coloured over them with some Ocean Soul Smooch ink, let it sit for a few seconds then gently wiped them with a kleenex.

To complete the cards I printed and cut out two images from Moonlight Journey and placed some little frames over them. Both were coloured with some metallic rub-ons in coordinating colours to match the backgrounds.

Wednesday, 10 November 2010

Easel ATC

On DCI I am participating in a swap where we are making an ATC with an easel.

I started by printing of some Bingo ATC backgrounds by Lisa Vollrath. I then stamped and embossed a Tim Holtz flourish in Gold on the right-hand side. I coloured the edges of the ATC with Vivid and Adirondack inks to add some depth.

I cut some light blue/gray cardstock to fit the top of the ATC and coloured the edges with the same inks. I then stamped and embossed the word stamp Postcard (Lost and Found Stamps) in gold. I attached this to the top with double-sided tape.

I printed off an image from Moonlight Journey's Autumn sheet and cut out the girl after adhering it to some cardstock and attached it with double-side foam tape.

I took some printer paper and coloured it with the same inks as the ATC and stamped a word stamp (Lost and Found) then ripped it in half and adhered it to the bottom of the card. To finish it off I coloured some paper flowers with Smooch Ink, added a little heart shaped gem to the centre and attached it to the top of the scroll.


I then made the easel and attached the ATC to the top portion. I added some decorative paper to the inside of the easel. I cut another piece of the blue/gray cardstock coloured the edges with the blue inks, punched a circle from different decorative paper and placed a little embellishment in the centre. I attached this at the bottom to make a stop-guard for the ATC.

Monday, 22 February 2010

Smooch Inks

I am participating in a HIT swap where we use Smooch inks on the card that we create.

I started by doing a technique called stamp smoosh using Clearsnap Fluid Chalk inks, which I learned from Cathie Allan who is a wonderful teacher. This was the background for the card.

I then stamped the Hearts in Touch stamp with Olive Fluid chalks then cut it to size. I stamped and embossed the HIT floral stamp twice on the card background piece then on a separate piece. I coloured them with Smooch ink Pool and Azure, using Pumpkin for the centre. The leaves were coloured with Smooch Green Apple. I then cut out the flowers and the little bee I left separate. The body of the bee was coloured with Gold Lame` and  Sugarberry and the wings with Moonlight.

I attached the stamped image of the woman to the card then added the bees and the extra flower with double-sided foam tape. I attached the whole piece to a coordinating colour of cardstock.

Wednesday, 16 September 2009

Inchie swap

I have signed up for a swap on the Dream, Create Inspire group where we are using a frame from Blumoth Crafts. Eleven people joined the swap, and we create the inchies using a colour scheme and and in some cases a theme chosen by each person. We have two inchies, the centre and the frame to complete our own when we receive our inchies in the swap. I have decided to wait until I receive my inchies before completing the frame.

I coated the inchies with gesso then used Acrylic paints, Metallic Paints, Lumiere paints, Perfect Pearls, Pearlex, and some of my stamps and stamping supplies such as Smooch inks, and pigment inks to do the bases. On some I used molding paste, others I used papers and even some netting type paper.

The embellishments are scrapbooking pieces, old buttons, old pieces of jewellery, brads and other "doodads".

I am really looking forward to seeing all the tiny works of art that everyone makes and the completed frames.


Friday, 20 March 2009

Celebrate Spring

There is another swap "Celebrate Spring" for which I have been playing with an idea.
I drew out a bird from a template I found on the Internet. I did direct-to-paper with Colorbox pigment inks and added some Smooch ink around the edges.

I stamped some images and coloured them with Prismacolor and Lyra pencils. I added some stickers that my friend Cathee sent me in a recent swap. I cut the end of the tail and the wings with some scalloped scissors. I added the "spring" quotes (Hero Arts) and the little butterfly on the tail. The eye is a flower from a cheap dollar store bracelet.
I was not completely happy with this piece so I made another one and am much more satisfied with the result.

The second one was done by applying scrapbook paper to both sides of my template, then doing direct-to-paper over it with Fluid Chalk inks.

On the Blue & Yellow side I stamped a Magenta Flourish stamp with Vivid green. I took a butterfly shaped Grungeboard piece, covered it in Glitter Ritz and embossed it in the Cuttlebug. The word Fly is also Grungeboard, coloured with Mustard Seed & Peeled Paint distress inks and Yellow pigment ink. The bird and tulip are stickers and the eye is a piece of confetti and a gem.

The orange/red/coral side was stamped with a Magenta border flourish stamp with Versafine Satin Red. The flower is a sticker and I added a scroll die cut and the rivet eye. The brad was added to cover the end of the "wings" on this side.

The wings are Cuttlebug leaf die-cuts, which I coloured again with the Fluid chalks on both sides and added the Hero Arts "spring" words with the same inks that I used for the body.