Friday, 17 December 2010
great blog candy give away
Erika, over at Taylored Concepts has a really large prize up for grabs. And I do mean large. You really got to see this giveaway.
Monday, 22 November 2010
Second Ezee Pzee Design Team Project
For my second project I decided to use a canvas. I started by colouring the background with some USArtquest Mica watercolour paints. After it dried I stamped and embossed a large flourish stamp in gold.
I covered the right side of the canvas with gel medium and placed some fantasy film over the top and heat set it with my embossing gun, then stamped and embossed the flourish stamp over the top again.
I added some snowflakes on the left with a stencil and molding paste. When they dried I painted them with the pearl white mica watercolour paint, then added some iridescent foil over the top. At the bottom I adhered the Tim Holtz musical tissue tape and painted over it with the mica watercolour paint to make it blend in more. To finish the sides and top I applied some opalite embossing powder and heated it.
The Ezee Pzee toy soldier was first coloured with colorbox fluid chalk inks, his face with acrylic paints, and the hat band and strings were painted with a gold leafing pen. I wanted it to be more vibrant so painted it with some varnish. I attached gold metallic cardstock behind the epaulets and the areas in the front of the uniform, then added glossy accents to fill the areas. The buttons are little green pearl embellishments.
Since I did not have the cut-out piece for the mustache I had to draw my own on black cardstock and embossed it with clear embossing powder. I had a bunch of the little googly eyes from previous craft projects and added them (sorry he is a bit cross-eyed as they kept moving when I scanned it LOL!).
I added a piece from an old earring as an emblem on his hat and a feather to finish it off.

First Project for the Ezee Pzee Design team
I received my wonderful box of goodies from Kathy at Engravit the company that makes the Ezee Pzee die cuts. It was filled with an array of items to play with and I got started with the first project.
I decided to make a Christmas card as I am way behind on my list.
I took a piece of 130Lb cardstock and did the "stamp smoosh" technique which I learned from Cathie Allan, using Clearsnap's Fluid chalks. I stamped and embossed the Poinsettia stamp then coloured it with Smooch Inks. I edged the panel with a red marker.
The little Elf was coloured with Acrylic Paints and I added some distress ink to the toy bag to give it definition. I added some smooch ink over the top of the Elf's clothing and the bow. I attached metallic cardstock pieces behind the words, and the elf's ears and eyes, and a bead for his nose.
The saying was stamped and embossed on an extra piece of the background and edged with the marker.

Thursday, 18 November 2010
Ezee Pzee play time
As you may have noticed I was chosen for a spot on a design team called Ezee Pzee by Engravit. I was really happy to be on the team as this is a local company and they have a good variety of chipboard pieces.
Prior to being chosen I had bought a pack of the chipboard and last night I decided to play with a couple of them.
For the first item, I took the little mitten and sealed it with some SoJonia sealer, then painted it with some green metallic paint. I added some lovely red velvet rick-rack as the cuff. I have some winter saying rub-ons and applied one of them to the body of the mitten.
I took a piece of cardstock that I had stamped ( a scrap I was not happy with!) edged it with a red marker, then applied three snowflake stickers that I got at the dollar store. I attached the mitten with some sturdy 465 3M tape.
 In this same package there was a little sleigh/sled and I could not think of how to use it, then I finally decided to make a Christmas Card with it.
I took a piece of white cardstock and stamped and embossed the snow covered tree and added some Stickles glitter to simulate snow. I coloured the remaining portion of the cardstock with some light blue chalk for a sky look. I discovered some Christmas frames with other embellishments at the dollar store, and chose one with red elements and applied the frame over the stamped image. This was applied to a red card front with double-sided foam tape.
I took the sled and sealed it then painted the main part with red acrylic paint and coloured the runners with a silver Krylon leafing pen. I coloured a piece of thin twine with a dark brown fluid chalk stamp pad using a Clearsnap stylus and black foam tip. I attached it to the front of the sled add some little gold and green embellishments to the sides. Again I added some Stickles glitter around the sled. To finish it I used another one of the rub-ons on the body of the sled.
I took a photo turn and attached a screw brad in the hole and attached it to the side of the frame, and hung the twine over it, and adhered the sled with some double-sided foam tape at the bottom of the card.

Prior to being chosen I had bought a pack of the chipboard and last night I decided to play with a couple of them.
For the first item, I took the little mitten and sealed it with some SoJonia sealer, then painted it with some green metallic paint. I added some lovely red velvet rick-rack as the cuff. I have some winter saying rub-ons and applied one of them to the body of the mitten.
I took a piece of cardstock that I had stamped ( a scrap I was not happy with!) edged it with a red marker, then applied three snowflake stickers that I got at the dollar store. I attached the mitten with some sturdy 465 3M tape.

I took a piece of white cardstock and stamped and embossed the snow covered tree and added some Stickles glitter to simulate snow. I coloured the remaining portion of the cardstock with some light blue chalk for a sky look. I discovered some Christmas frames with other embellishments at the dollar store, and chose one with red elements and applied the frame over the stamped image. This was applied to a red card front with double-sided foam tape.
I took the sled and sealed it then painted the main part with red acrylic paint and coloured the runners with a silver Krylon leafing pen. I coloured a piece of thin twine with a dark brown fluid chalk stamp pad using a Clearsnap stylus and black foam tip. I attached it to the front of the sled add some little gold and green embellishments to the sides. Again I added some Stickles glitter around the sled. To finish it I used another one of the rub-ons on the body of the sled.
I took a photo turn and attached a screw brad in the hole and attached it to the side of the frame, and hung the twine over it, and adhered the sled with some double-sided foam tape at the bottom of the card.

Canvas ATC"S
In my Art-Ventures group, Carol S proposed a swap for ATC's on canvas. Luckily I had a couple of canvas ATC bases and joined the swap. As it turns out only 3 of us joined in so I had sufficient to complete the swap.
I decided to do the same technique but in different colours.
I painted the bases with gesso and let it dry. I coloured the first one with green paint, let it dry then added blue over the top. I let it dry a bit then spritzed it with rubbing alcohol and then dabbed over it with a cloth, allowing some of the green to show through. For the second one, I painted the base with orange, let it dry then added a burgandy red over it and followed the same procedure as the first, allowing some of the orange to show.
After they dried completely, I embossed them with a dreamweavers stencil and embossing paste and set them aside. When they were dry I used leafing on both. On the the orange/red one I applied a variagated orange colour, then I added some green apple smooch ink to the vines and to cover some of the areas missed by the leafing I coloured with Pumpkin Smooch ink.
On the blue one I coloured the vines with the Green Apple Smooch, but the silver on the flowers was a bit glaring so I coloured over them with some Ocean Soul Smooch ink, let it sit for a few seconds then gently wiped them with a kleenex.
To complete the cards I printed and cut out two images from Moonlight Journey and placed some little frames over them. Both were coloured with some metallic rub-ons in coordinating colours to match the backgrounds.

Monday, 15 November 2010
Scraplings
I joined another swap to make some Scraplings. Basically these are a miniature card which are normally 1.25" X 4.25" because they are made from off-cuts after making a card or other project. The premise is to use all your scraps to complete the Scrapling.
This is a great way to use pieces that you would normally throw away.
This particular swap has a red/green/white colour scheme, but how we create it is entirely up to us.
I ended up making three as I was actually enjoying the whole process.
 For the one on the left, I stamped an image with Vivid ink, outlined it with a green marker and attached it to the green cardstock. I added a red die-cut and a pearl embellishment which I coloured with alcohol ink. I wrapped some green thread around the card and added some white pearls. To complete it I stamped the saying with fluid chalk ink and attached it with double sided tape.
The middle one was just a fun idea I had as the image is one of my favourites. I stamped the base with some green Versafine ink using a background stamp. I stamped the face with warm red fluid chalk ink and cut it out. I added some velvet rick-rack at the bottom then inserted the face just above it. I stamped and embossed the word Zen and the Z's on a piece of scrap cardstock and coloured it with the red fluid chalk and outlined them in green. I made a crown out of a stamped scrap piece of paper and added it above the Z's. For the final touch I took a punched flower, another scrap piece and added a little paper gem to finish off the bottom.
The last card was stamped and embossed in white on the red card base. I took a sticker and attached it to a piece of white cardstock and clear embossed it. I coloured around the sticker with two colours of green fluid chalks. I then stamped a swirly snowflake stamp in red over the area, and wiped off the overstamping on the sticker. I framed it by using Be-creative (Sookwang) tape and Hunter Green Glitter Ritz. I had some little butterfly embellishments but felt it needed something so I attached a couple of tiny beads for the body and glued it to the top. I added some gem pieces to the bottom to complete it.
I am not sure which two I will be sending to my partner but I guess I can decide that when the swap closes.
This is a great way to use pieces that you would normally throw away.
This particular swap has a red/green/white colour scheme, but how we create it is entirely up to us.
I ended up making three as I was actually enjoying the whole process.

The middle one was just a fun idea I had as the image is one of my favourites. I stamped the base with some green Versafine ink using a background stamp. I stamped the face with warm red fluid chalk ink and cut it out. I added some velvet rick-rack at the bottom then inserted the face just above it. I stamped and embossed the word Zen and the Z's on a piece of scrap cardstock and coloured it with the red fluid chalk and outlined them in green. I made a crown out of a stamped scrap piece of paper and added it above the Z's. For the final touch I took a punched flower, another scrap piece and added a little paper gem to finish off the bottom.
The last card was stamped and embossed in white on the red card base. I took a sticker and attached it to a piece of white cardstock and clear embossed it. I coloured around the sticker with two colours of green fluid chalks. I then stamped a swirly snowflake stamp in red over the area, and wiped off the overstamping on the sticker. I framed it by using Be-creative (Sookwang) tape and Hunter Green Glitter Ritz. I had some little butterfly embellishments but felt it needed something so I attached a couple of tiny beads for the body and glued it to the top. I added some gem pieces to the bottom to complete it.
I am not sure which two I will be sending to my partner but I guess I can decide that when the swap closes.
Thursday, 11 November 2010
I'll Be Home for Christmas Tags
On AFTCM I joined a swap to make two tags for a partner with the theme" I'll Be Home for Christmas". The size and interpretation of the theme is entirely up to us.
The first tag I made, I fell back to using one of my favourite colours-blue. I had some cardstock that I had already coloured using stamps and fluid chalk inks with a touch of gold. I cut this to size in the shape of a house and stamped the image by Paper Inspirations with Versafine Black Onyx ink and coloured some of the areas. I stamped a piece of vellum with the Hero Arts Music Sheet stamp and attached it to the top to simulate a roof. I then edged the piece with a blue marker.
On the same cardstock I added some Brilliance Pearlescent Lavender ink, cut pieces to fit around the edge of the image then stamped the various word stamps using stamps from Hero Arts and TPC Studios and attached them to the sides and bottom with double-side foam tape.
For the top I stamped "Believe" from a Tim Holtz stamp and edged it in gold and attached it with the double-sided foam tape. I then punched some snowflakes, added glitter and glued them to the top and sides of the word.
 To make the second tag I started by cutting the cardstock template in a house shape with a chimney. I coloured the background with red and green Clearsnap fluid chalk inks. I stamped an Inkadinkado snowflake flourish stamp and embossed it with green glitter then repeated it in a couple of areas and embossed it in white.
For the chimney I used a portion of a Christmas stamp by Stampington and Co., stamped it twice and added it to the left-hand side and added glitter to the top to simulate snow. I also added some metallic tape to the top of the roof.
I took a small chipboard frame and embossed it with pearl green embossing powder and stamped a holly stamp into it while hot. I added some red Stickles for the berries, then inserted the picture of the little girl courtesy of Trish B, added a piece of transparency over the top to protect it and attached it to the tag.
I coloured a piece of cardstock with green fluid chalks, stamped and embossed the saying by Rubber Stampede and attached it with double-sided foam tape. To complete the tag I added the little poinsettia embellishment.
 I hope my partner will be pleased with the two tags.
The first tag I made, I fell back to using one of my favourite colours-blue. I had some cardstock that I had already coloured using stamps and fluid chalk inks with a touch of gold. I cut this to size in the shape of a house and stamped the image by Paper Inspirations with Versafine Black Onyx ink and coloured some of the areas. I stamped a piece of vellum with the Hero Arts Music Sheet stamp and attached it to the top to simulate a roof. I then edged the piece with a blue marker.
On the same cardstock I added some Brilliance Pearlescent Lavender ink, cut pieces to fit around the edge of the image then stamped the various word stamps using stamps from Hero Arts and TPC Studios and attached them to the sides and bottom with double-side foam tape.
For the top I stamped "Believe" from a Tim Holtz stamp and edged it in gold and attached it with the double-sided foam tape. I then punched some snowflakes, added glitter and glued them to the top and sides of the word.

For the chimney I used a portion of a Christmas stamp by Stampington and Co., stamped it twice and added it to the left-hand side and added glitter to the top to simulate snow. I also added some metallic tape to the top of the roof.
I took a small chipboard frame and embossed it with pearl green embossing powder and stamped a holly stamp into it while hot. I added some red Stickles for the berries, then inserted the picture of the little girl courtesy of Trish B, added a piece of transparency over the top to protect it and attached it to the tag.
I coloured a piece of cardstock with green fluid chalks, stamped and embossed the saying by Rubber Stampede and attached it with double-sided foam tape. To complete the tag I added the little poinsettia embellishment.

Wednesday, 10 November 2010
Easel ATC
On DCI I am participating in a swap where we are making an ATC with an easel.
I started by printing of some Bingo ATC backgrounds by Lisa Vollrath. I then stamped and embossed a Tim Holtz flourish in Gold on the right-hand side. I coloured the edges of the ATC with Vivid and Adirondack inks to add some depth.
I cut some light blue/gray cardstock to fit the top of the ATC and coloured the edges with the same inks. I then stamped and embossed the word stamp Postcard (Lost and Found Stamps) in gold. I attached this to the top with double-sided tape.
I printed off an image from Moonlight Journey's Autumn sheet and cut out the girl after adhering it to some cardstock and attached it with double-side foam tape.
I took some printer paper and coloured it with the same inks as the ATC and stamped a word stamp (Lost and Found) then ripped it in half and adhered it to the bottom of the card. To finish it off I coloured some paper flowers with Smooch Ink, added a little heart shaped gem to the centre and attached it to the top of the scroll.

I then made the easel and attached the ATC to the top portion. I added some decorative paper to the inside of the easel. I cut another piece of the blue/gray cardstock coloured the edges with the blue inks, punched a circle from different decorative paper and placed a little embellishment in the centre. I attached this at the bottom to make a stop-guard for the ATC.

Home Decor for Christmas
I have not taken any classes since my local rubber stamp store closed last year, but we now have another store Scrap 'N Bean that is offering various classes, so I decided to take this one last week, you can view the class picture at Engravit (scroll to the bottom of the page).
The three blocks of wood are covered with decorative paper then distressed by sanding and adding ink to the edges. The Embellishments are covered with Judikins glaze and coloured with alcohol inks, the snowflakes are Ezee Pzee die-cuts which have been cut down into various sizes and attached to the piece.
I added my own twist to it. I added glitter to the snowflakes and added some Magenta beads as berries on the leaves. I still have to add ribbon and raffia to the edges.
Sorry the picture does not do it justice as it came out quite light when I photographed it.

Monday, 8 November 2010
Altered CD Jewell Case
In the AFTCM group I am doing a swap where we alter a CD case and make a booklet to go inside with a winter theme.
I started by cutting some lunamatte paper to fit inside the front portion of the CD cover folded in half; which would be the booklet. I used two pieces so it would not be too bulky.
I stamped images, coloured them with Copic and Tombo markers, added glitter to some of the pages and added colour with my inkpads and Clearsnap stylus, and edged some with my markers. I finished it by sewing the centre together with some blue metallic thread.


For the front of the case I covered it in some silver toned paper. I stamped a Magenta image with brown memories ink added some white and silver glitter around the edges, I attached this to the centre. For the left edge I stamped and embossed the saying and edged it with a marker, and added some snowflake stickers.


I also wanted to include a little extra item with the CD case. I recently bought some die-cuts made by a local company Ezee Pzee (Engravit.net), one being a snowflake. I took this and embossed one side with Peacock glitter embossing powder. On the other side I painted it with white acrylic paint and then embossed it with a different colour of glitter embossing powder. This is hung over the tree brad and can be removed to use on the Christmas tree or as a package topper, or whatever else the recipient chooses.
 I also painted the black portion of the CD holder with a silver Krylon leafing pen, as I felt that the black was a bit glaring against the images.
This will be mailed and on it's way to my partner sometime this week.
I started by cutting some lunamatte paper to fit inside the front portion of the CD cover folded in half; which would be the booklet. I used two pieces so it would not be too bulky.
I stamped images, coloured them with Copic and Tombo markers, added glitter to some of the pages and added colour with my inkpads and Clearsnap stylus, and edged some with my markers. I finished it by sewing the centre together with some blue metallic thread.


For the inside right I took a piece of cardstock cut in a circle the size of a CD and covered it with black paper. I inked it with several colours of Opalite inks then stamped a snowflake background (Pedlars Pack) with Brilliance Moonlight White. I then took a snowflake cut-out and stamped and embossed a snowflake image on it an attached it to the centre of the circle. I added a little tree brad at the top and taped the circle to the area where the CD would be placed.

I also wanted to include a little extra item with the CD case. I recently bought some die-cuts made by a local company Ezee Pzee (Engravit.net), one being a snowflake. I took this and embossed one side with Peacock glitter embossing powder. On the other side I painted it with white acrylic paint and then embossed it with a different colour of glitter embossing powder. This is hung over the tree brad and can be removed to use on the Christmas tree or as a package topper, or whatever else the recipient chooses.

Friday, 22 October 2010
One of a Kind Dimensional Door Swap
Carol S is hosting a swap on Art-Venturers for a One of a Kind Dimensional Door Swap. The rules are:
Back to the drawing board; I retained the base picture that I was originally going to use, which is from Ceremony-Share, but instead of leaving it "as-is", I added some colour to it with Stabilo Chalk pencils. Printed and cut out an image from ArtbyJean, and mounted it with double-sided foam tape. I added a wee circle "thingy" and a part from old jewellery at the top.
I started thinking about what to do to make this thick, so I took some popsicle sticks and cut them to size to fit on the edge of the base ATC and attached them with some Sookwang tape.
For the top of the ATC I took a piece that I had coloured with some Perfect Pearls and some other mediums, and measured out the door and cut it on the top and middle. I embossed some columns on the sides and some small stamped images at the top and bottom.
I added tiny screw brads along with some faux metal pieces for the edges on the door. To hide the back of the brads I added an embossed piece of cardstock to the back of the door. For the door closure I chose to use string clasps, but instead of string I used some stretchy metallic thread and adhered a couple of flat beads.


- it must have a door/gate/arch that can open,
- reveal something behind the door,
- and be so thick that it can not fit in a regular envelope with normal postage
Back to the drawing board; I retained the base picture that I was originally going to use, which is from Ceremony-Share, but instead of leaving it "as-is", I added some colour to it with Stabilo Chalk pencils. Printed and cut out an image from ArtbyJean, and mounted it with double-sided foam tape. I added a wee circle "thingy" and a part from old jewellery at the top.
I started thinking about what to do to make this thick, so I took some popsicle sticks and cut them to size to fit on the edge of the base ATC and attached them with some Sookwang tape.
For the top of the ATC I took a piece that I had coloured with some Perfect Pearls and some other mediums, and measured out the door and cut it on the top and middle. I embossed some columns on the sides and some small stamped images at the top and bottom.
I added tiny screw brads along with some faux metal pieces for the edges on the door. To hide the back of the brads I added an embossed piece of cardstock to the back of the door. For the door closure I chose to use string clasps, but instead of string I used some stretchy metallic thread and adhered a couple of flat beads.


House shaped ATC
On DCI we are doing a swap for a House shaped ATC with or without a chimney, and the artists choice of themes.
I recently saw a video by Maria Loomis for a vintage tag technique and decided to use it for my background. I actually started by colouring my ATC with Vivid inks then embossed it in my Cuttlebug. I added both Tattered Angels sprays and Smooch Spritz to it. I added Vintage Photo and Soot Distress Inks to the edges.
I took a piece of transparency and stamped the HIT stamp with Stazon ink and adhered it to the background with Glossy Accents. I glued the image of the little girl onto some cardstock to give it body, then attached it to the background. Printed off the clock face and added a little sticker to the centre then attached it to the top of the ATC. I found some gorgeous ribbon at my local stamp store and attached a portion to the side and then coloured part of it with Smooch green Apple Ink.
To accentuate the roses at the bottom of the little girl I added some red micro beads.
To complete the ATC I coloured some cardstock with Vivid inks spritzed it with Smooch Spritz and stamped a saying. I then cut this in to pieces and attached to the ATC.
 This is the one I kept for myself and the colour palette is a wee bit lighter than the ones I mailed to all the participants.
I recently saw a video by Maria Loomis for a vintage tag technique and decided to use it for my background. I actually started by colouring my ATC with Vivid inks then embossed it in my Cuttlebug. I added both Tattered Angels sprays and Smooch Spritz to it. I added Vintage Photo and Soot Distress Inks to the edges.
I took a piece of transparency and stamped the HIT stamp with Stazon ink and adhered it to the background with Glossy Accents. I glued the image of the little girl onto some cardstock to give it body, then attached it to the background. Printed off the clock face and added a little sticker to the centre then attached it to the top of the ATC. I found some gorgeous ribbon at my local stamp store and attached a portion to the side and then coloured part of it with Smooch green Apple Ink.
To accentuate the roses at the bottom of the little girl I added some red micro beads.
To complete the ATC I coloured some cardstock with Vivid inks spritzed it with Smooch Spritz and stamped a saying. I then cut this in to pieces and attached to the ATC.

Tuesday, 14 September 2010
A card for a special friend
A dear friend of mine who has been widowed for a number of years is getting married this month, and I decided to make a wedding card for her and her groom.
I first stamped the couple (Inkadinkado) and coloured it with Lyra colour pencils. I made a mask and covered the stamped image with it, the did the background.
The background was done with Fluid Chalk inks, then I stamped Mica Magic Yellow Gold with a heart stamp in various areas.
I just bought a gorgeous flourish stamp by Hero Arts, and decided to use it on the card. I left the mask in place on the cardstock and stamped the flourish with Pigment Goldrush ink and embossed it with Ancient Gold Embossing powder. After heat setting, I removed the mask.
I played around with various ideas to put at the top left corner to finish the card. I tried various stamps using my stamp positioner to see how they would look, but did not like any of them. I finally decided on using die cut letters, (cut out 3 times and glued togehter to make them thicker) to spell out LOVE. Again, I fiddled with various mediums on them, and finally settled on embossing them with the same Ancient Gold embossing powder.
I edged the card front with a marker and adhered the panel to a card base in a mustard yellow colour.

Accordian Artist Trading Cards
As usual I jumped in with both feet and joined a swap for an accordion atc. Was not sure if I was on the right track but I sat down and made it.
The theme was architecture, so I used stamps of buildings, houses and other related items as well as free images I had saved on my computer. So her is what I ended up with after playing around for a few days. First pic is the cover.


 The back cover just contains my name and email addy as well as the group name, with a little stamped piece on the edge to cover the accordian binding.
The theme was architecture, so I used stamps of buildings, houses and other related items as well as free images I had saved on my computer. So her is what I ended up with after playing around for a few days. First pic is the cover.


Thursday, 2 September 2010
Calendar Pages-Prototype #2
I was back in my craft room last night and still not sure about the first prototype that I made, so I started playing around with an another idea, part of it being inspired by Cathie Allan's article in the October issue of Scrap and Stamp Arts.
I decided to make a page that would reflect a little bit about Remembrance Day (Veteran's Day in the US) and did the stamp smoosh technique again using blue tones at the top for the sky and red, creamy brown and yellow at the bottom.
I printed the poem In Flanders Fields written by John McRae, a Canadian Doctor who served in WW1, and placed it on a piece of red card stock. I stamped the birds (Tim Holtz) on the "sky" portion to represent the larks mentioned in the poem.
I have a lovely Poppy stamp (Embossing Arts) and thought I would use it. I started with a piece of white cardstock and used the "smack down" technique from Cathie's article using a large and small tulip stamp by Magenta Style and gold pigment ink and Mica Magic burnt orange.
I placed the cardstock in the Cathie Allan Postion-it and stamped the poppy head in Blackbird fluid chalk. I coloured it in with some of the burnt orange ink and the tip of a smooch ink applicator. I highlighted with gold lame smooch ink, did the centre with mollasses smooch ink, then added siren smooch ink over the entire piece. With the cardstock still in the positioner I stamped the image again with the blackbird fluid chalk ink. I did three of these and cut them out.
I took a piece of white cardstock and cut it to look like a cross and added a little red punch flower to it, and placed it on top of the poppies. This again has all the images taped on it as I am still debating about what to do for this swap.

Any comments or critique appreciated. Let me know which one you like best if you were the recipient of this calendar page since I am still torn as to which way to go with the pages.
Calendar Pages-Prototype #1
I joined a calendar swap and started working on my prototype for the month of November.
Where I live we quite often have snow in November, so I was thinking of a cold or snowy picture when I started creating this page.
I started by taking some 80Lb cream cardstock and Clearsnap fluid chalks inks and did a background using alabaster, ice blue and lavender using the Stamp Smoosh technique I learned from the wonderful Cathie Allan. You load a solid stamp with ink and smoosh it around on the card stock until all the ink is gone and keep repeating this until you are happy with it.
Using Tsukineko Versafine Imperial Purple ink, I stamped the church stamp and added the large tree at the left, both from Stampscapes Since we have a lot of Birch trees here I decided to add a few using a stamp (Stampendous) stamping the first image, masking it off and then adding more to make a grove of trees.
It looked a bit naked so I took a stamp with a road, hills and trees (A stamp in the Hand), masked off part of it and stamped it below the church.
I also decided to add a moon using a negative image of a punched circle. I started by colouring it with a grey coloured pencil, added some Twinkling H2O buttercup. then Pearl-ex express white pearl and iridescent violet. This stuck out like a sore thumb so I took the fluid chalk alabaster and dabbed it over the moon with a stylus and white applicator, which toned it down.
Since this is a prototype the calendar grid is only taped on till I decide whether or not I am completely happy with what I created.

Saturday, 28 August 2010
Witches Hour Torso Tags
I just joined a new group Art for the Creative Mind and have already signed up for a couple of swaps. One of the swaps is where we make two torso shaped tags with the theme Witches Hour i.e. Halloween.
The first one I coloured with Clearsnap fluid chalk inks but it was not intense enough, so I spritzed the top and bottom with Glimmer Mists and went over the centre with some Mica Magic Burnt Orange ink. I stamped the Stampscapes Crooked Limb stamp with the Smokey Gray Versafine ink pad, then I added the images and saying from Vintage Paint Works which were one of the free downloads on their site.
To complete the tag, I added some little confetti stars at the top and some maple leaf punchies at the centre and bottom.

For the second tag, I started by punching out a circle and placing the negative part on the tag, and colored it with some yellow pigment ink then some silver over a portion of it, then added some iridescent violet mica watercolour paint over the same area.
I masked the circle with the punched out piece and using the tonal applicator stamp (Stampscapes), I added colour, starting with Clearsnap's Vivid yellow along the centre up to the top, then Marvy Matchables inks in Salvia Blue, Blue, Pale Violet and Green.
I stamped a Stampscapes fir tree, crooked limb stamp and a cloud stamp with Clearsnap's Coal Black Ancient Page. The Owl image is from Vintage Paint Works. The remaining images are from Dover Publications; (You can sign up and receive free samples each week from them by following the link).
 Although I don't normally make any Halloween art, I did enjoy making these two tags.
The first one I coloured with Clearsnap fluid chalk inks but it was not intense enough, so I spritzed the top and bottom with Glimmer Mists and went over the centre with some Mica Magic Burnt Orange ink. I stamped the Stampscapes Crooked Limb stamp with the Smokey Gray Versafine ink pad, then I added the images and saying from Vintage Paint Works which were one of the free downloads on their site.
To complete the tag, I added some little confetti stars at the top and some maple leaf punchies at the centre and bottom.

For the second tag, I started by punching out a circle and placing the negative part on the tag, and colored it with some yellow pigment ink then some silver over a portion of it, then added some iridescent violet mica watercolour paint over the same area.
I masked the circle with the punched out piece and using the tonal applicator stamp (Stampscapes), I added colour, starting with Clearsnap's Vivid yellow along the centre up to the top, then Marvy Matchables inks in Salvia Blue, Blue, Pale Violet and Green.
I stamped a Stampscapes fir tree, crooked limb stamp and a cloud stamp with Clearsnap's Coal Black Ancient Page. The Owl image is from Vintage Paint Works. The remaining images are from Dover Publications; (You can sign up and receive free samples each week from them by following the link).

Wednesday, 25 August 2010
E is for...
On Art-Ventures we are continuing on with the Alphabet swap that we started on CCSwaps. This month is E for....
I have several blank notebooks so thought I would use one of them for this swap. My E is for embossing ( both dry and heat), Electric Blue Smooch Spritz and embellishments.
I started by taking a cardboard insert that I saved from something I bought, cut it to size and on the white front I used Clearsnap fluid chalk inks (Yellow Cadmium, Lavender and Deep Lagoon) and the "stamp smooch" technique that I learned from Cathie Allan.
I heat set it and then stamped the flourish stamp by Magenta using Clearsnap Platinum MetaleXtra Pigment Inkpad and Platinum Embossing Powder, at the top and bottom of the page. I outlined the page with Krylon silver ink and attached it to the front of the notebook.
I had some pieces of cardstock that I had previously embossed with my Cuttlebug and I chose a navy blue piece that had words embossed on it. I took a Versamagic inkpad and rubbed it across the piece. Was not entirely happy with it so then I sprayed it with Clearsnap's Electric Blue Smooch Spritz; attached this to the centre of the cover.
I took a piece of an old book page and smooshed Milled Lavendar distress ink over it and edged it with Black Soot distress ink, then took some water and rubbed it over the edge to blend the colour in to the paper. When dry I added this to the front of the embossed piece.
I cut out an image from Moonlight Journey and attached it to the middle of the embossed piece. I had some tiny die-cut swirls in my stash, so I embossed them with the platinum ink and embossing powder and glued them to the edges of the image. I had some chrome buttons that I cut the backs off and attached them to the right hand corner and the bottom of the notebook.
I hope my partner will be pleased with this.

Completed Vision Book Received
I received all my pages for the DCI Vision Book and have bound them (although not very well). Because it was so fat it was hard to keep it in the binding machine, but I am so thrilled with all the pages and so glad to have been a part of this swap with all these wonderful talented artists!
Here are all the pages that I received:


Here are all the pages that I received:


Thursday, 22 July 2010
DCI Fat Vision Book pages completed
After checking some local stores as well as some while we were away for a few days, I managed to find some additional embellishments for my Fat Book. I found some little coins and some brads (bathing trunks and lounge chairs) and some flag cocktail picks. I also made a little compass with shrink plastic and grommets painted with a copper krylon pen and found some other things in my stash.
I changed the colours on some of the stamped images and added some other details.
I hope all the ladies will be pleased with my take on this.
This is the page back and front with the added embellishments. They will be mailed to the participants in the next couple of days.

I changed the colours on some of the stamped images and added some other details.
I hope all the ladies will be pleased with my take on this.
This is the page back and front with the added embellishments. They will be mailed to the participants in the next couple of days.

Thursday, 24 June 2010
Fat Vision Board Book
I signed up for a fat book swap on DCI which is based on a vision book and has to have lots of embellishments both on the page and dangling from the sides which means it will not close completely when bound. Each person was assigned a specific theme.
I have a lot to do in July and thought I would get a head start on this, although to be honest not sure about it as the only vision board examples I could find are just a bunch of pictures collaged on a strata.
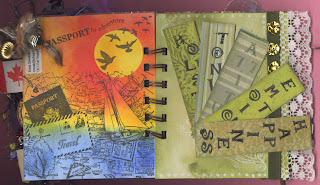
I have done a mock up of what I think it should be for this swap, without the embellishments dangling off the side as I still have to buy some for my theme, which is Travel.
So far nothing is glued to the page, just taped on since I am still playing with the whole layout and might change or add some things-- still not sure if I am on the right track with this!! Any constructive criticism, ideas or thoughts would be appreciated.

I have a lot to do in July and thought I would get a head start on this, although to be honest not sure about it as the only vision board examples I could find are just a bunch of pictures collaged on a strata.
I have done a mock up of what I think it should be for this swap, without the embellishments dangling off the side as I still have to buy some for my theme, which is Travel.
When I think about travelling, I think of the scenery first, the sky, sea, mountains, lakes and sunsets, so I started by colouring my page in colours that remind me of those things. I then stamped a bunch of pieces that represent different modes of travel, a postcard, and a travel type image. I also stamped some film strips and printed off tiny pictures of various scenic areas, and of course a camera, since when travelling pictures are a "must" to preserve all the memories. Found some stamp embellishments in my stash so added one of those, stamped a small image on to card stock then on to a small chipboard piece. Also smashed some bottle caps, stamped a postage franque (frank) on card stock coloured with Vivid inks, punched it out and placed it in the bottle cap. These few items have added some dimension to the page. The little lighthouse is stamped, cut out, then covered with Glossy Accents, however, I may do it in a different colour as it blends in to the background too much.

Saturday, 19 June 2010
Fabric Charms
Another swap on the Stitches Coven group; we are to make 5 similar charms constructed out of our handmade fabric which consists of layering fabric and other materials together using Misty Fuse or in my case Heat and Bond.
I started off with a hot pink organza as the base, added some different colours of moon paper. The next layer was some glittery gauze type paper from Magenta Style along with some Mulberry paper. The next layer was some fancy threads and red netting.
Will be sending these off to the hostess in the next week.

I started off with a hot pink organza as the base, added some different colours of moon paper. The next layer was some glittery gauze type paper from Magenta Style along with some Mulberry paper. The next layer was some fancy threads and red netting.
After constructing this I cut out two strips and added Pellon to the back, then cut two strips and sewed the long edges with my tiny serger. I then cut these two pieces into different sizes and sewed the other edges with my Tiny Serger. I decided to use different colours of eyelets, and punched the holes with my Japanese Screw Punch then attached the eyelets with my eyelet setter.
Will be sending these off to the hostess in the next week.

Wednesday, 16 June 2010
Fabric Paper Postcard
The second swap in Stitches Coven is to make a postcard using homemade fabric or fabric paper. I chose to use the fabric paper. The paper was made by using a Jaycloth as the bottom layer, then placed pieces of gift wrap over it with watered down white school glue. Then I added some tissue paper that I had previously coloured over the top. Normally the tissue is plain white and the colours added afterwards.
I cut the paper to 4"X6" for the postcard size then cut additional strips, and punched out three circles.I attached paper flowers and beads to the circles with invisible thread. I took the two strips and stamped them with some Mica Magic inkpads to add a wee bit of contrast.
I added some batting to the 4"X6" piece and stitched it in squares on my sewing machine. I then took the two strips and attached some ribbon behind and sewed the pieces to the ribbon. I attached the strips to the postcard with some Wonder-Under making sure the ends were tucked in well. I then sewed the little circle flowers to the postcard.
I cut a piece of fabric the same size as the postcard and attached it to the back with Wonder-Under and then sewed around the whole piece with my tiny serger.

I
Tuesday, 15 June 2010
Heart Swap
I signed up for a swap on Art-Ventures where we are required to make a decorated heart. I started with the heart I had done for the Julia Andrus Book Study - Corrosive Effects. I wanted to brighten it up a bit and added some Siren Smooch Ink over the surface.
I dug out some little flower shaped beads and added a "gem" to each one and glued them on the heart. I took a picture of a little girl (sorry can't credit the site as this image is from my computer which is in the shop for repair) and cut it down to fit under the heart. I coated it with Judikins MicroGlaze which protects the image from water.

I had some little heart pieces with beads on wire, that I had not used and decided to do the faux sea glass ( Julia Andrus-Paper Transformed) on the hearts. I used pigment inks on each one then added clear embossing powder. I rubbed them with perfect medium and applied Pearlex powders, then clear embossing powder, heated them and sprayed with water to pit the surface. I wound this around the heart.
I dug out some little flower shaped beads and added a "gem" to each one and glued them on the heart. I took a picture of a little girl (sorry can't credit the site as this image is from my computer which is in the shop for repair) and cut it down to fit under the heart. I coated it with Judikins MicroGlaze which protects the image from water.
I attached some dangly beads to the bottom, then cut out a piece of cardstock in the heart shape and adhered it to the back.

Wednesday, 9 June 2010
Fabric Postcard
I recently joined a new group that is doing different things with fabric and are currently running a fabric postcard swap.
I have not sewn in years and just got my sewing machine repaired. To be honest, I think I need to relearn how to use all the fancy stitches and bells and whistles!! I also don't have a great variety of fabrics at the moment so I had to use what I had on hand.


I have not sewn in years and just got my sewing machine repaired. To be honest, I think I need to relearn how to use all the fancy stitches and bells and whistles!! I also don't have a great variety of fabrics at the moment so I had to use what I had on hand.
I started by sewing a few different pieces of fabric together than added a glittery organza type fabric over the top and stitched some fibres over this. I took some pieces of fancy lace items and coloured them with fabric paint and sewed them on. I then attached some little roses on by hand. The edge looked a bit raggedy so I attached some trim around it. Still not 100% pleased with it.

Took time today to figure out how to thread my Singer Tiny Serger; bit frustrating but finally figured it out thanks to the step by step pictures in the booklet that came with it. As I was not happy with the edging on the piece I took my tiny serger and went around the edges and think it looks a lot better now. At least I am much happier with the look of it.

Subscribe to:
Posts (Atom)