Showing posts with label Pinata inks. Show all posts

Thursday, 13 June 2013

Colour Perceptions Artist Trading Card

On ArtVentures we are starting a new ongoing swap theme "colour perceptions", with each month being a different colour. For this we must think layers of the colour and must be  predominatelythe colour for that month. Inspiration/theme is based on and emotion/how the colour us makes us feel,

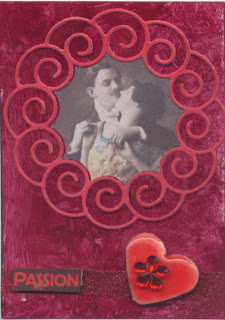
For this month the colour is red, and this colour made me think of love and passion.

I took a piece of glossy white cardstock and coloured it with Sangria PiƱata Alcohol Ink and pounced it on with Caro extender and a felt pad.

I coloured some white cardstock with Lipstick Red Fluid Chalks then cut out the Memory Box curly wreath. I had printed off some pictures of lovers previously so I also cut them out with the die and placed it in the centre of the curly wreath on the ATC.

I punched some heart from 130LB cardstock and layered 3 together to give them some body, and coloured them with a red marker. I melted some clear UTEE and added some garnet Heat-it-Inks, dipped the hearts in it and when dry added a little flower gem.

I attached a piece of Sookwang tape to the bottom of the ATC and covered it with Fire Red and burnished it and attached the heart to the side.

I coloured some white cardstock with Red Pepper Adirondack ink and stamped the PSX Pixie Expressions stamp in Versfine Onyx Black and attached it to the glitter piece with double-sided foam tape.
Tuesday, 26 April 2011

Hat Pins

On AFTCM the list Mom proposed a fast swap - Hat Pins.

I managed to find some corsage pins at Michaels and I have lots of beads on hand, so I started creating.  I chose to colour the heads of the pins to match the bead colour families, and did it with alcohol and Pinata inks.

I unfortunately was not thinking about the fact that we are to send 6 the same to the hostess and just went on my merry way creating and enjoying the process. Here is the selection I made, but I have made another batch to send for the swap.

These are easy to make and I had fun looking through the beads and deciding what to put on each one.

Thursday, 13 May 2010

Mini Memory for Vickie

Vickie is the person chosen for May's Mini Memory on DCI. Her theme is Wings and colours are Purple and Lime Green.

I started with a back cover of an old book and removed the paper from it. I painted it with gesso then added dimension with a stencil and molding paste. I painted over it with green and purple acrylic paints and added iridescent violet over the purple section.

I found the little arch thing at the dollar store and since it was silver, I coloured it with Pinata` ink in a purple colour.  I did the same thing with the scabble pieces to spell out FLY.

I took some purple prima flowers and added brads with green dots on them to the centres, twirled some wire to simulate vines and glued them to the board. I had some left over paper which was a piece of a magazine column that I had stamped on with Versamark, gessoed, dried,  then coloured using a Colorbox stylus and purple stamp pad. I put this behind  the little arch piece then glued it to the board.

The little bird is from Magenta and it is painted with purple acrylic, crackle medium and lime acrylic paint. The final touch was a little gem for the eye.

Friday, 23 April 2010

Inchie Swap

I signed up for an Inchie Swap on CCSwaps. I first thought of making a little notebook but Carol is doing that for her swap so thought I would do something different.

I have a stash of beautiful embossed papers and decided to use them instead of hoarding them. I started by punching circles from the various papers and punched small holes for them to be used as tags.

Two of the white ones I coloured with Twinkling H2O's then sprayed with Glimmer Mists. Another one, I coloured with Fluid Chalks and sprayed with the Glimmer Mists. The other two white ones were coloured with Fluid Chalk inks.

One black piece was coloured with Fresco chalk inks the second with Versamagic inks then sprayed with silver Glimmer Mists.

The final piece is a Pinata~ ink background stamped with a snowflake stamp in gold. Thought this one was appropriate for the little girl that I used on the inchie who looks rather angelic.

The inchies were made from scraps of my homemade background papers and various freebie images. The Dragonfly was a scrap of plumbers tape that I had embossed in the Cuttlebug that I punched then coloured with Adirondack pens.

I may add something to the binder ring that I attached to make it a bit more attractive.

Friday, 5 February 2010

Play day

I joined a swap in CCSwaps which is an alphabet swap and we must create something using the letter A as a theme, technique or medium. In order to create something I had a play day with a couple of techniques prior to actually making anything for the swap.

The first one was alcohol inks and I found a marbling techique while browsing the web. You fill a container with approximately 1" of water and drop some of the alcohol inks in an swirl them around, then lay some glossy cardstock on top and then lift it out. Do not submerge the cardstock!

The ones on the left are just AI's. The middle one, I added silver mixatives. Far right is AI's and Pinata` ink.

The Pinata` ink just kind of floated on the surface of the water, but I rather liked the effect. If you like really vibrant colours then you may not like this technique or you may have to add a lot more ink or maybe even use a coloured cardstock.


The second technique was one that a member of another group posted. For step-by-step instructions you can see them on Michi's blog. For this technique you need metallic cardstock, acrylic paints and acrylic glaze medium. Well it has been one of those weeks where Murphy's Law kicked in and nothing goes quite right. I accidently used extender medium instead of glaze. So I went back and used glaze on a few scrap pieces of cardstock to see if it made any difference and I think the glazed ones are a bit glossier.

The first pictures are done on metallic cardstocks and the next set are done on white matte to use up the excess paint the larger one is white glossy CS.
I also did one on a silver/pewter cardstock


Here are the ones I did on silver and gold cardstock using the glaze as in Michi's directions.

Her is one that I was not happy with. I think the key is to make sure that the paint mixture is not too thick and smoosh the cardstock and lift it up quickly to get the nice details. This one I may play with and add something more and then maybe I will like it better.

Friday, 20 November 2009

Christmas Gift

I am participating in a swap on CCSwaps were we are exchanging Christmas gifts. I made several items but was not completely happy with them. Today I received a newsletter from Stampington and Company and they featured a little bird made using a small chipboard box with a clear lid. This inspired me to try something similar.

Of course I have no little boxes like that so had to improvise as usual!!! I had a small circular tin from some hand cream so decided to use the lid as the body. I covered it with moulding paste using an old plastic doily as a stencil to give it some texture. After it dried I sprayed it with Memories and Tattered Angels spray then added some Posh Impressions metallic ink in the same color family.

I took an embellishment that I bought at the dollar store and added a pearl to the centre and some little gems around the perimeter. Glued this to the body then attached the little letters to spell out "Fly".

For the head I printed off a bird picture, adhered it to some 130LB cardstock, cut it out and then covered it with some modge podge.

The wings were cut out of some silver embossing metal. I covered them with some Pinata`inks, then stamped a Magenta stamp on them. With my metal stylus I embossed the stamped portion. I felt it was too monochromatic and removed some of the red & orange, and added some yellow alcohol ink.

The legs are some coloured wire that I twisted to make feet. I covered the back with some cardstock to hide all the bits and pieces and attached a piece of ribbon as a hanger.

I think it might be a bit quirky for some people and am hoping the Debra will like it.


Tuesday, 19 May 2009

May Quote of the Month

This month's quote is : "Do not dwell in the past, do not dream of the future, concentrate the mind on the present moment" Buddha


As usual, I started off with one thing then switched after being unhappy with the original concept where I took 2 pictures, one of an old town and one of a futuristic city and transferred them to paper. Just did not come together as I thought because I could not think of an image to incorporate into the theme.

While doing the brocade booklet, I had for some reason, stamped a Buddha stamp on an extra chipboard cover, and then realized it had nothing do with what I had created. So, I decided that I would use it for the Q.O.T. M. for May.

I took an old CD and coloured it with alcohol and Pinata` inks, then stamped a cherry blossom with Pearl Mica magic and heat set it. I attached the stamped Buddha piece and added one of my homemade dragonfly embellishments to cover the hole in the chipboard.

I printed off the quote and mounted it on some black card stock. Added this to the bottom of the image using some double-sided foam tape on the bottom portion so that it was evenly set on the CD. The final touch was to add the two Chinese coins.

On the back of the CD I added a round piece of card stock from Magenta. I then added a little easel to the back using some scraps of card stock.